
One of the first demos each physics engine is presenting is of a working car, driving on a predefined terrain. It is a wonderful demo, showing off impostors, joints, motors and integration with other frameworks.Let's see how to do that using Oimo.js and Babylon.js.
In this tutorial I will explain the implementation of the Oimo.js "All-Terrain" car using Babylon.js' new physics engine architecture. The demo, for the impatient readers, is here: http://www.babylonjs-playground.com/#SFELK#2 . As you can see, the car has working wheels, it can turn right and left (surprise!), and it has (kind-of) suspensions.
A quick note before I begin. Every time I present a new physics demo, I get asked the same question - why is everything based on simple geometric shapes? why is the car so "simple"?
A car is a complex object, it is not a simple box with 4 spheres for wheels. And you are right! But not in the physics-engine world. I am showing just the impostors. Take the impostors, cover them with a nice mesh of a beautiful Ferrari (or a Lada, if that's your thing), and everything will look better. Deep inside thou, they will still be boxes and spheres.
Let's first cover the steps we need to take in order to reach our goal:
- Construct the basic scene - car mesh(es), ground.
- Enable the physics engine
- Set up the impostors
- Connect the impostors using joints:
a. Joints for the wheels b. Joints for the suspensions - Enable user input
- Add a bit of terrain objects
- Improvements, like first-person driving simulator
- ???
- Profit selling the next need for speed!
Constructing the basic scene
For the basic scene, we will require a simple flat ground, a few obstacles for our car, 4 wheels and one body:
//the ground
var ground = BABYLON.MeshBuilder.CreateGround("ground", {
    width: 4000,
    height: 4000
}, scene);
ground.position.y = -70;

//The car's body:

//wheel radius
var rad = 50;
//height
var h = 40;
//width
var w = 50;
//depth
var d = 100;

var body = BABYLON.MeshBuilder.CreateBox("body", {
    width: (w + 20) * 1.5,
    height: h,
    depth: (d + 40) * 1.5
}, scene);

//the wheels:

var wheel1 = BABYLON.MeshBuilder.CreateSphere("wheel1", {
    diameterY: rad,
    //make the wheel look like... a wheel.
    diameterX: rad/2,
    diameterZ: rad,
    segments: 5
}, scene);
wheel1.position.copyFromFloats(-(w + 30), -20, -d);

var wheel2 = BABYLON.MeshBuilder.CreateSphere("wheel2", {
    diameterY: rad,
    diameterX: rad/2,
    diameterZ: rad,
    segments: 5
}, scene);
wheel2.position.copyFromFloats((w + 30), -20, -d);

var wheel3 = BABYLON.MeshBuilder.CreateSphere("wheel3", {
    diameterY: rad,
    diameterX: rad/2,
    diameterZ: rad,
    segments: 5
}, scene);
wheel3.position.copyFromFloats(-(w + 30), -20, d);

var wheel4 = BABYLON.MeshBuilder.CreateSphere("wheel4", {
    diameterY: rad,
    diameterX: rad/2,
    diameterZ: rad,
    segments: 5
}, scene);
wheel4.position.copyFromFloats((w + 30), -20, d);
Great, we now have the meshes we need and it all looks like this : http://www.babylonjs-playground.com/#1PVBTF
Enabling the physics engine
As I want to show how to build a car using Oimo.js, I will be using the OimoJSPlugin:
scene.enablePhysics(undefined, new BABYLON.OimoJSPlugin())
If you ask why undefined, it is due to pure laziness (and the fact that I want to show you, that you can be lazy too). Undefined (or null) will simply set the default gravity to be -9.81 in the Y axis, the standard gravity in our beautiful, beautiful world.
That's all it takes to enable physics, now we need to start defining impostors
Set up the impostors
I have a car, which is built using a single box (the car's body) and 4 wheels/spheres. As Oimo has only 3 impostor types - Box, Sphere and Cylinder, I think it is obvious which one we will take.
I define the ground and car's impostors like this:
//set up the ground impostor:
ground.physicsImpostor = new BABYLON.PhysicsImpostor(ground, BABYLON.PhysicsImpostor.BoxImpostor, {
    //ground should stay in place
    mass: 0
});
//the car body's impostor
body.physicsImpostor = new BABYLON.PhysicsImpostor(body, BABYLON.PhysicsImpostor.BoxImpostor, {
    mass: 80,
    friction: 0.5,
    restitution: 0.5,
    nativeOptions: {
        noSleep: true,
        move: true
    }
});

//The wheels impostors:
[wheel1, wheel2, wheel3, wheel4].forEach(function(w) {
    w.physicsImpostor = new BABYLON.PhysicsImpostor(w, BABYLON.PhysicsImpostor.SphereImpostor, {
        mass: 1,
        friction: 4,
        restitution: 0.5,
        nativeOptions: {
            move: true
        }
    });
});
We have now all of the impostors we need to continue, and our scene looks like this - http://www.babylonjs-playground.com/#1PVBTF#1
You will notice, that all meshes are simply free-falling until they touch the ground. This is because we haven'T connected the car using joints. Which is our next step!
Joints (The physics-engine type)
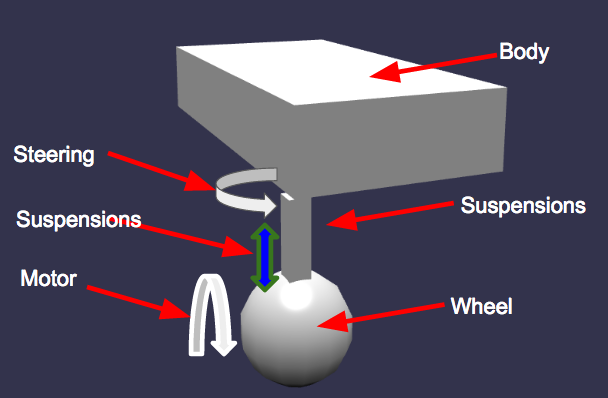
Let's first see what movement we require and on what axes. This way we will understand better what joints we will require.
- Angular movement between the car and the wheel on the y axis - to enable steering
- Linear movement between the car and the suspensions - to allow a "4x4" style spring suspensions
- Angular movement between wheel and suspension on the z axis (in local coordinates) - so that the car can move forwards!
Very poorly illustrated:
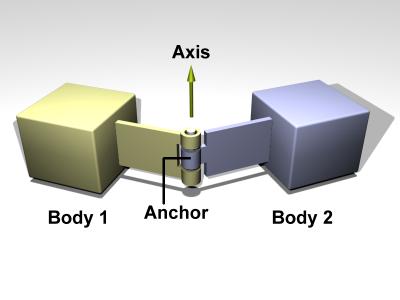
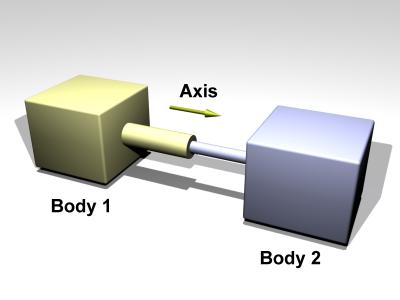
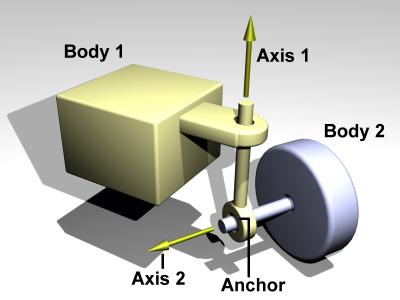
What joints correlate to these movement types? We have a few options:
(Note - great thanks to the ODE physics engine documentation. Without them no one would have joint illustrations)
- A joint / constraint that has angular movement only on one axis is the hinge joint:
- A joint the has linear freedom in one defined axis is the prismatic joint. Think slider joint that only moves backwards and forwards.
- A joint that has two hinge joints combined in one is the wheel joint
- A joint that has angular AND linear freedom of movement on the same axes is the slider joint, which is the prismatic joint with an extra angular movement. Think prismatic joint that can also turn.
What I chose:
- Slider joints for the connection between the suspensions and the car body
- a Hinge joint for the connection between the wheel and the suspensions.
Talking about suspensions, you might have noticed I haven't created them yet. Let's add them to the party, right after the last code we added. I will also make them invisible, so they would only server as the connection between the wheel and the car:
//suspensions:
var holderSize = 20;

var holder1 = BABYLON.MeshBuilder.CreateBox("holder1", {
    height: holderSize,
    width: holderSize / 2,
    depth: holderSize / 2
}, scene);
holder1.position.copyFromFloats(-w, -20, -d);

var holder2 = BABYLON.MeshBuilder.CreateBox("holder2", {
    height: holderSize,
    width: holderSize / 2,
    depth: holderSize / 2
}, scene);
holder2.position.copyFromFloats(w, -20, -d);

var holder3 = BABYLON.MeshBuilder.CreateBox("holder3", {
    height: holderSize,
    width: holderSize / 2,
    depth: holderSize / 2
}, scene);
holder3.position.copyFromFloats(-w, -20, d);

var holder4 = BABYLON.MeshBuilder.CreateBox("holder4", {
    height: holderSize,
    width: holderSize / 2,
    depth: holderSize / 2
}, scene);
holder4.position.copyFromFloats(w, -20, d);

//set the holders' physics constraints
[holder1, holder2, holder3, holder4].forEach(function(h) {
    h.isVisible = false;
    h.physicsImpostor = new BABYLON.PhysicsImpostor(h, BABYLON.PhysicsImpostor.SphereImpostor, {
        mass: 8,
        friction: 4,
        restitution: 0.5
    });
});
The slider joints
I decided to use a slider joint to connect the car and the suspension object. I could have chosen the wheel joint, and then connect the wheel to the suspension with the wheel joint, and then connect the body and the suspensions with a prismatic joint. The main question is - where do we want our angular steering constraint - at the connection to the car (turning the suspensions AND the wheel) or just down at the wheel. I chose the first one, as it made more sense.
An oimo.js slider joint has another wonderful feature - a motor. A motor will enable angular movement. I will use this motor to enable steering. I will also limit the motorical angular movement, so that the steering direction will be limited as well. We don't want the steering to turn without stopping.
Let's see the definition of the first slider joint:
Testing
//The MotorEnabledJoint provides functions to control the motor movements.
var sJoint1 = new BABYLON.MotorEnabledJoint(BABYLON.PhysicsJoint.SliderJoint, {
    //The connection's pivot. Explained down below
    mainPivot: new BABYLON.Vector3(-w, -20, -d),
    //The axis on which the slider works, which is the Y axis
    mainAxis: new BABYLON.Vector3(0, -1, 0),
    //The axis connection of the second body and the main one
    connectedAxis: new BABYLON.Vector3(0, -1, 0),
    //Oimo native parameters
    nativeParams: {
        //Motor limits
        limit: [0, 0],
        //Enable springs
        spring: [100, 2],
        //Minimum distance (suspensions)
        min: 5,
        //Maximum distance
        max: 30
    }
});

//Connect the first holder and the body using this joint
body.physicsImpostor.addJoint(holder1.physicsImpostor, sJoint1);
The main pivot
The main pivot is the point on the main physics impostor to which the 2nd body will be connected. Connecting two objects without defining the pivot will connect both at the center of their mass. This might be the desired functionality in various cases, but we want the suspension to start from the 4 edges of the car, and not from the middle of it. Here is a quick example to explain things:
Without pivot - http://www.babylonjs-playground.com/#BGUY , the sphere will be connected to the center of the object. This means that they are both connected in their 0,0,0 position (in local coordinates). But What if we want to connect the sphere to a different point of the log? Here it is with pivot defined: http://www.babylonjs-playground.com/#BGUY#1
If it is not understandable now, please leave a comment!
So the main pivot is the edge of the car's body.
The axis chosen
The slider joint has one axis defined. As I require the movement on the y axis, the axis I chose was (0, -1, 0). If you wonder why -1 and not 1, it is due to the way I am connecting the two obejct - which object is the main one. The movement should happen on the Y axis, that is true, but towards the floor, and not towards the sky. And as I am connecting the body to the suspensions (the car's body is the main impostor) the axis is actually -1 on the y axis.
Native parameters
The native parameters are engine-specific parameters that the other engines don'T have. These are parameters that only Oimo.js will understand and are therefore separated from the rest. If you use native parameters, you won't be able to simply change the engine from Oimo to Cannon. This will require a bit of work.
The native parameters in this case correlates to the constraints in hand - min and max are the definition of the length of linear movement - how long will the suspension be. The limit is a definition for the motor - what is its movement limits.
There are 3 other slider joints, all with the same definition (but with a different pivot, of course). Then we are done connecting the car to the suspensions.
The hinge joints
To connect the wheel and the suspensions I will use a hinge joint.
A hinge joint is also a motor enabled joint, which means that it can move in a specific direction, if provided with the right parameters.
Let's see how I defined the joint:
var joint1 = new BABYLON.HingeJoint({
    mainPivot: new BABYLON.Vector3(0, -20, 0),
    connectedPivot: new BABYLON.Vector3(30, 0, 0),
    mainAxis: new BABYLON.Vector3(-1, 0, 0),
    connectedAxis: new BABYLON.Vector3(-1, 0, 0),
    nativeParams: {
        limit: [0, 0]
    }
});
holder1.physicsImpostor.addJoint(wheel1.physicsImpostor, joint1);
When adding all 4, you will notice something very interesting:
http://www.babylonjs-playground.com/#1PVBTF#2
The joints struggle to stay in place.
Oimo's default number of iterations (10) doesn't allow it to process the joint constraints correctly. If you notice that your joints are "losing" their axis, try increasing the number of iteratiosn the engine is running per frame. This might (might!) hurt performance, but if you need a car, there is no way out of this. (Note - Oimo themselves solve it differently - they run a "correction" function to keep the wheels in place. I find this method to be a hack. Hacks are great, but not the best solutions in the world).
To increas the number of iterations, set the first variable in OimoJSPlugin constructor:
scene.enablePhysics(undefined, new BABYLON.OimoJSPlugin(200))
Notice how the suspensions are now in tact and stay in the y axis: http://www.babylonjs-playground.com/#1PVBTF#3
You might notice that the car goes crazy after a while. We will take care of that in a second when we enable user input.
Enable user input
I want my car to drive! so it is time to enable the user input. I always prefer the arrow keys on WASD, but it's really up to you if you want to change it.
The main concept - with keyDown the engine will start moving forward (or steering will be triggered). With keyUp the movement will be reset.
I will comment in the code with explanations:
//The control object - what is happening at the moment.
var actions = {
    steering: 0,
    velocity: 0
};

var deg45 = Math.PI / 4;

//current rotation angle
var angle = 0

//My keyUp / reset implementation
function keyUp(event) {

    var key = event.keyCode;

    switch (key) {
        //left and right arrows
        case 37:
        case 39:
            actions.steering = 0;
            break;
        //up and down arrows
        case 38:
        case 40:
            actions.velocity = 0;
            break;
    }

    updating = false;
}

//when a key is pressend
function keyDown(event) {

    var key = event.keyCode;

    switch (key) {
        case 37:
            actions.steering = 1;
            break;
        case 38:
            actions.velocity = -1;
            break;
        case 39:
            actions.steering = -1;
            break;
        case 40:
            actions.velocity = 1;
            break;
    }
    updating = true;
}

//add the event listeners
document.addEventListener('keydown', keyDown);
document.addEventListener('keyup', keyUp);

//remove listeners when the scene is disposed
scene.onDispose = function() {
    document.removeEventListener('keydown', keyDown);
    document.removeEventListener('keyup', keyUp);
}

var steeringLimit = Math.PI / 6;
var updating = false;

/**
The update function will be in change of updating both motors - steering and movement on each frame.
*/
function update() {

    //get the current steering direction
    var steering = actions.steering;

    //change the angle of steering
    angle += steering * 0.1;
    //set the max/min angle. so that the wheels won't turn 360 degrees
    angle = angle = angle > steeringLimit ? steeringLimit : angle < -steeringLimit ? -steeringLimit : angle;

    //Make both front wheels turn!

    //First set the motor's limit - from/till what angle should it move.
    sJoint3.setLimit(angle, angle);
    sJoint4.setLimit(angle, angle);
    //The back wheels should ALWAYS be straight
    sJoint1.setLimit(0, 0);
    sJoint2.setLimit(0, 0);
    //Now add force to force steering movement.
    sJoint3.setMotor(steering, 1);
    sJoint4.setMotor(steering, 1);

    //Is that car moving forward / backwards?
    var velocity = actions.velocity || 0;
    //Calculate the velocity of a single wheel
    var wheelVelocity = 10 * Math.PI * velocity;

    //set this force to all wheels (simulating a 4x4 car).
    joint1.setMotor(wheelVelocity, 6);
    joint2.setMotor(wheelVelocity, 6);
    joint3.setMotor(wheelVelocity, 6);
    joint4.setMotor(wheelVelocity, 6);
}

//Run the update function on every frame, so acceleration and wheel movement will work smoothly.
scene.registerBeforeRender(update);
This is what it looks like afterwards : http://www.babylonjs-playground.com/#1PVBTF#5
Now I can move the car forward and backwards. If the ground is too slippery for you, add some friction! You could also add mass to the wheels to keep them firm on the ground.
I can also steer, with an angle changing over time. Try it yourself!
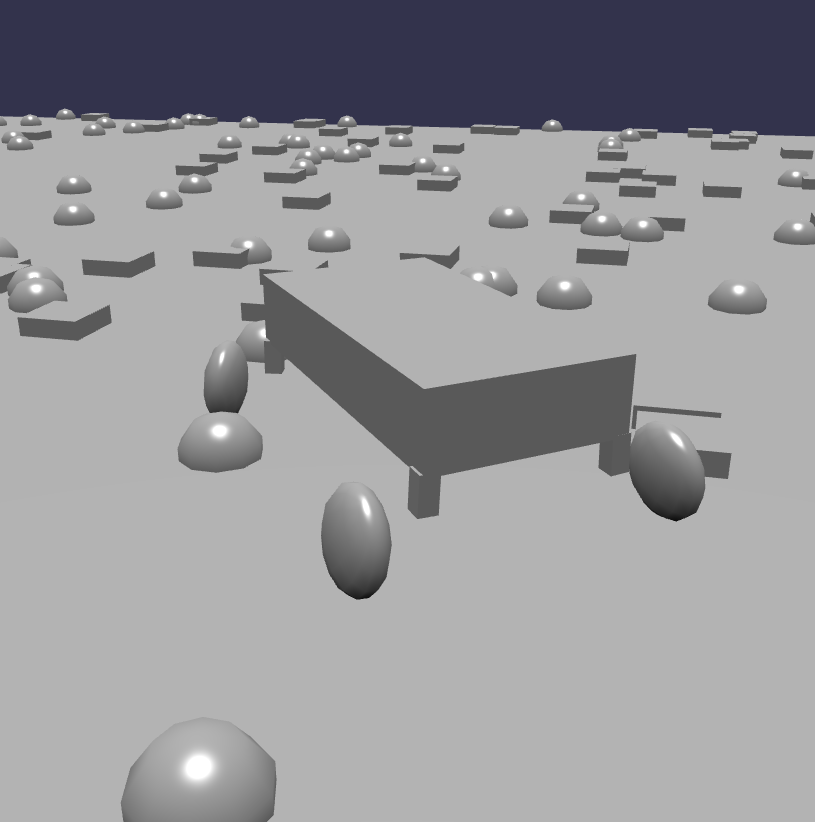
Terrain objects
The car I built is a 4x4 suspended car. Now we need to test it!
Let's add a few objects in the way:
//general randomize function
function rand(mult) {
    return Math.random() * (Math.random() < 0.5 ? -1 : 1) * mult;
}

//Obstacles
for (var index = 0; index < 300; index++) {
    var s = BABYLON.MeshBuilder.CreateSphere("o" + index, {
        segments: 3,
        diameter: rad
    }, scene);
    s.position.copyFromFloats(rand(2000), -70, rand(2000));
    s.physicsImpostor = new BABYLON.PhysicsImpostor(s, BABYLON.PhysicsImpostor.SphereImpostor, {
        mass: 0,
        friction: 4,
        restitution: 0.1,
        nativeOptions: {
            move: false
        }
    });
}

for (var index = 0; index < 300; index++) {
    var s = BABYLON.MeshBuilder.CreateBox("o" + index + 300, {
        segments: 3,
        width: rad,
        height: rad,
        depth: rad
    }, scene);
    s.position.copyFromFloats(rand(2000), -80, rand(2000));
    s.physicsImpostor = new BABYLON.PhysicsImpostor(s, BABYLON.PhysicsImpostor.BoxImpostor, {
        mass: 0,
        friction: 4,
        restitution: 0.1,
        nativeOptions: {
            move: false
        }
    });
}
And now we have a few obstacles in the way: http://www.babylonjs-playground.com/#1PVBTF#6
Improvements
camera movement
There are a few improvements I can implement rather easily
First, you would notice that when pressing forward the camera moves as well.
To cancel that simply cancel the camera movement keys. The simplest way is... to reset the keys arrays:
    camera.keysDown = [];
    camera.keysUp = [];
    camera.keysLeft = [];
    camera.keysRight = [];
Different types of cameras
We can add a camera that will server as a first-person camera, like we are the drivers. I have created two cameras. a regular free camera, and a "virtual reality" camera that can be moved with a cell phone:
var camera = new BABYLON.FreeCamera("freeCamera", new BABYLON.Vector3(0, 0, -80), scene);
var cameraVR = new BABYLON.VRDeviceOrientationFreeCamera("vrCamera", new BABYLON.Vector3(0, 0, -80), scene);
camera.parent = body;
cameraVR.position = body.position;
body.isVisible = false;
here it is: http://www.babylonjs-playground.com/#1PVBTF#7
Notice that I set the car's body AND the holders invisible.
And that's it!
Now I have a very simple car implemented in Oimo.js and Babylon.js. This is a very simple demo and a very simple tutorial just to get you started. Of course there is a lot more to do.
I hope I managed to teach a bit about the constraints/joints and how to use them. If you have any questions, please write them in the comments and I will answer as soon as I can!